As an Amazon Associate I earn from qualifying purchases.
How To Build a Fire in Any Conditions
How To Build a Fire in Any Conditions
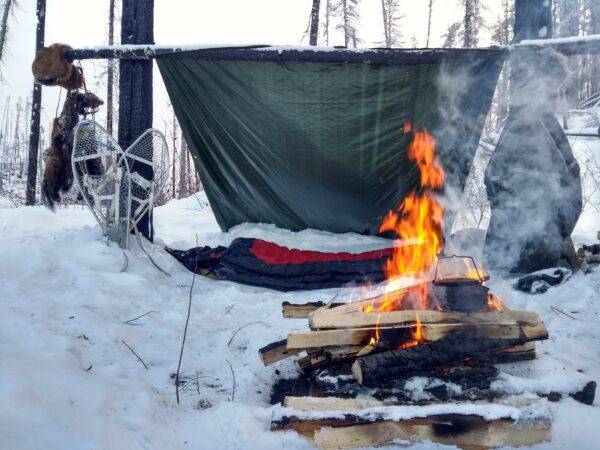
Summers are short in the Yukon Territory. Weather, like you see in the picture above, is normal here. It doesn’t really matter where you live though; the ability to build a fire is an essential skillset. In this post our goal is to show you how to easily build a fire – in any conditions.
Why you might need to build a fire
The simple truth is that the ability to build, and maintain a fire, can save your life. Especially out in the backcountry. A seemingly small mistake can quickly turn an average outing into a life or death situation. I know. Like a lot of things, I’ve learned over the years, I learned this lesson the hard way. Had it not been for a very savvy hunting partner, that mistake would have killed me. I will spare readers the details of my mistakes that day. Suffice it to say, that I got into trouble when I chose to leave my rain-gear behind. Hypothermia, is something I now take very seriously. I also carry a good fire building kit with me at all times.
Hypothermia is a very dangerous condition and its onset will hamper your ability to build a fire.
Outdoorsmen, and women, should all know the signs and symptoms of hypothermia. It’s important to understand that hypothermia is a medical emergency. It is also a condition that can deteriorate very quickly. Normal body temperature is 98.6 F ( 37 C). Hypothermia will occur when your body temperature falls below 95 F ( 35 C ).
If left untreated hypothermia will lead to complete failure of the heart and respiratory system and death will follow.
The first signs of hypothermia are:
.Shivering
. Clumsiness / lack of coordination
. Slurred speech
. Confusion
. Shallow breathing
. Weak pulse
The primary treatment for hypothermia is methods to warm the body. This is where building a fire comes in. In my experience, cool damp days are the most dangerous. Wet clothing accelerates heat loss through conduction and evaporation, and a fire is much harder to start when everything is damp.
In the early stages of hypothermia you will lose some of your fine motor skills. Even a slight loss of dexterity in your hands will make some tasks, ( like using a lighter) much harder. This is why it is so important to have more than one ignition source with you at all times.
Fire, and the ability to build one, is the single most important skill that has kept mankind alive and thriving since the beginning of time. Populations all over the globe would have died off centuries ago if they hadn’t mastered the ability to build a fire.
Sadly, the ability to make a fire is a skill set that is no longer being passed down to younger generations. In my work as a wilderness guide, it is rare to find anyone under the age of 40, who can reliably build a fire in adverse conditions. The reality is, that urban populations rarely, if ever, actually need to build a fire. All that changes as soon as you leave those urban environments and head into the woods.
Ignition sources
An ignition source is the most important piece of any fire making kit. Forget about a magnifying glass or any other gimmick that uses the sun. They might work in the tropics, but they will be useless on a cold rainy day in the woods. My personal rule is to always have three sources of ignition with me, and have one of them on my person at all times. This point can’t be stressed enough. An accident can cause you to be separated from your gear and that ignition source you have in your pocket can save your life.
An old friend and client we will call Bruce, found himself in that exact situation one cold fall day while he was moose hunting in northern Yukon Territory. His guide was a young inexperienced fellow who decided to cross a large lake late one evening when the wind was up. Bruce’s concerns fell on deaf ears as the guide started motoring across. Once they cleared the leeward shore the little boat started taking on water. Bruce bailed for all he was worth, while the guide held a steady course for the opposite shore. By Bruce’s estimation they were about two thirds of the way across before a particularly large swell, rolled the bottom heavy boat over.
Bruce said the water felt like needles when he went under. Luckily the little craft had good flotation compartments under the seats and didn’t sink. Both Bruce and the guide were able to cling to the side of the boat and keep their heads out of the water. The wind drove the boat to ground on a rocky windswept point about 15-minutes later. With all their gear lost when the boat capsized, the Zippo lighter Bruce always carried in his pocket was a lifesaver that night.
A lighter is my go to source of ignition; but they can be hard to use when your hands are cold. For this reason, I always carry a ferro-rod fire-starting tool, and water-and-windproof matches on every outing.
The ignition sources I recommend:
Despite what you see on the TV show Survivor, ferro- rods are easy to use.
A ferro-rod should be used for the sparks it provides only. The magnesium found on some models is not needed. Magnesium ignites easily and produces a lot of heat, but it burns much faster than the material we will explore later.
A better method is to use a ferrous-rod to ignite a fire starting material with a long burn time. To use a ferro-rod, scrape the edge of the metal striker along the rod. Use a quick motion. Much like you would strike a match. With very little practice you will be able to produce a lot of sparks with each strike. Larger ferro-rods are easier to use than smaller models; especially with gloves. These tools are completely water-proof.
The easiest path to a good hot fire, is to start with some sort of fire-starter
Whatever fire-starter you choose, make sure it can be easily ignited with a spark, (some can’t be) because you might not always have the open flame from a match or a lighter.
The following material can all be easily ignited with a spark.
Cotton balls soaked in Vaseline makes a great fire-starting material that is easy to ignite, and impervious to the elements. A single cotton ball will burn long enough to get a fire going even in extreme conditions. One small container of vaseline and a bag of cotton balls will make enough fire-starter for a long time. This is a very economical way for the DIY types to make their own fire-starting material.
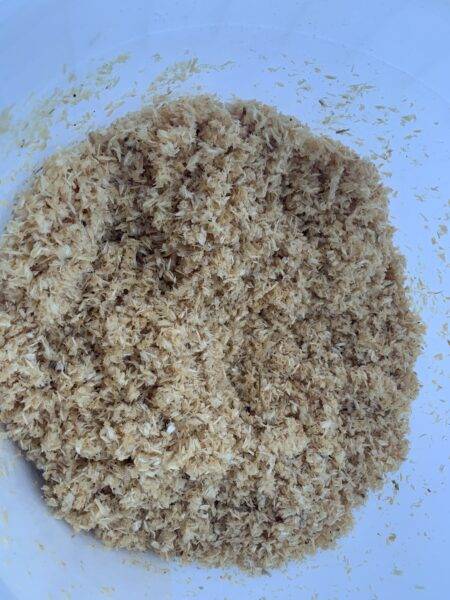
Another great fire-starting material, (and my personal favourite) is sawdust soaked in kerosene. A trapper friend showed me how to make, and use, this many years ago.
Course sawdust, like the sawdust a chainsaw produces is best. Simply fill a container with the sawdust and add some kerosene. I like to mix up a gallon at a time, so I use an old ice cream pail for this.
Add just enough kerosene so the sawdust appears damp. Let it sit for an hour while the kerosene soaks into the wood fiber. You may, or may not, have to add more kerosene. Your goal is sawdust that looks damp, not runny.
Once the sawdust has soaked up the kerosene, its ready to use. The sawdust should be stored in plastic containers with screw on lids. I use small 8-ounce containers. They store easily, and the smaller containers make it easier to take just what I need for a particular outing.
The sawdust/kerosene mixture is very easy to ignite with any ignition source, and it will burn for a long time. I have used it almost exclusively for almost a decade now. A small bottle of kerosene will make enough fire-starter for several seasons.
Fire Pits
A campfire site should be chosen with care. The last thing anyone wants is to start a forest fire. A fire pit doesn’t have to be fancy. Choose an open location whenever possible and good solid ground is best. Moss or any other organic material such as leaves or needles should be scraped away. Rocks placed in a circle are a good idea if they are available. Avoid building fires directly under big trees or in heavy brush.
The basics of fire-building
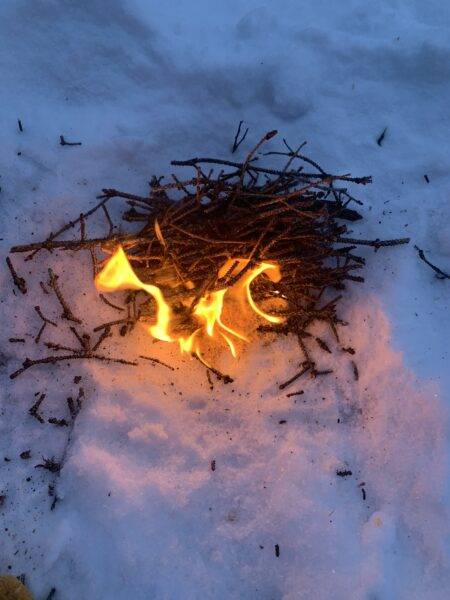
Once an area has been chosen to build a fire the next step is to collect dry twigs or small branches. Start with small stuff you can break with your hands. Get a small pile of this material together and place your fire-starter near the bottom. One vaseline soaked cotton ball, or a tablespoon of the sawdust mixture is all you need.
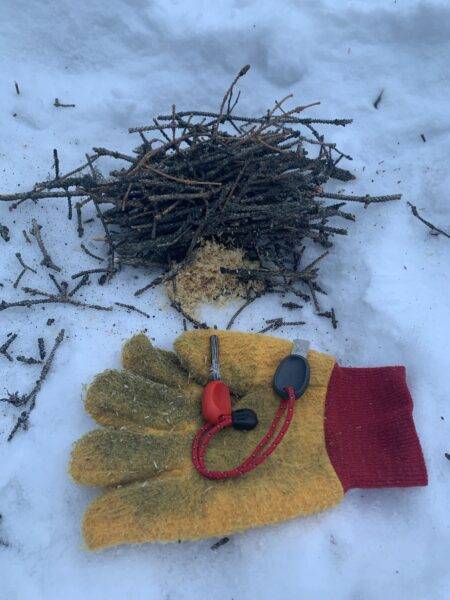
Point the ferro-rod directly at the fire-starting material. The point of the rod should be almost touching the fire-starter. One stroke will usually produce enough sparks to ignite the firestarter. With the small twigs burning, keep adding larger pieces of dry wood until you have a good fire going.
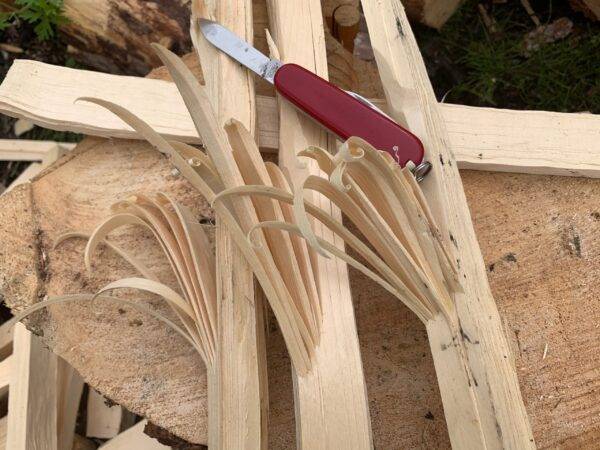
Finding enough dry twigs to get a fire going in inclement weather can be a challenge. Feather sticks are by far the best option in these circumstances.
They are easy to make, and will give you all the dry tinder you need in just seconds. To make a feather stick, simply shave a dry stick with a knife. This process exposes the dry wood underneath, even in extremely wet conditions. I like to leave the ‘feathers’ I have shaved attached to the stick. A few feather sticks are all you will need to get enough heat to ignite larger pieces of wood.
The ability to build a fire quickly in any weather is often overlooked, but this is a skill everyone should master. The fact is, it could save your life.
Pro Tip: A small canvas tool bag is an ideal way to keep your firestarting kit together. Its a good idea to have one in each vehicle, as well as your backpack.
Amazon and the Amazon logo are trademarks of Amazon.com, Inc, or its affiliates.